Handmade DIY Wedding Invitations, place cards, favours, menu's etc
I made Wedding Stationery for a family member yearssssss ago and I just realised that I never actually showed anything I made! And I did all this in 2013! Shame on you Loops....shame! Now, when it came to actually taking photos of everything I made, muggins here wasn't the greatest at keeping my blog in mind. I was so busy and snowed under making it all, that most of the time I forgot to take proper, decent photos.....but I'll share what little (and dodgy) photos I did manage to take.
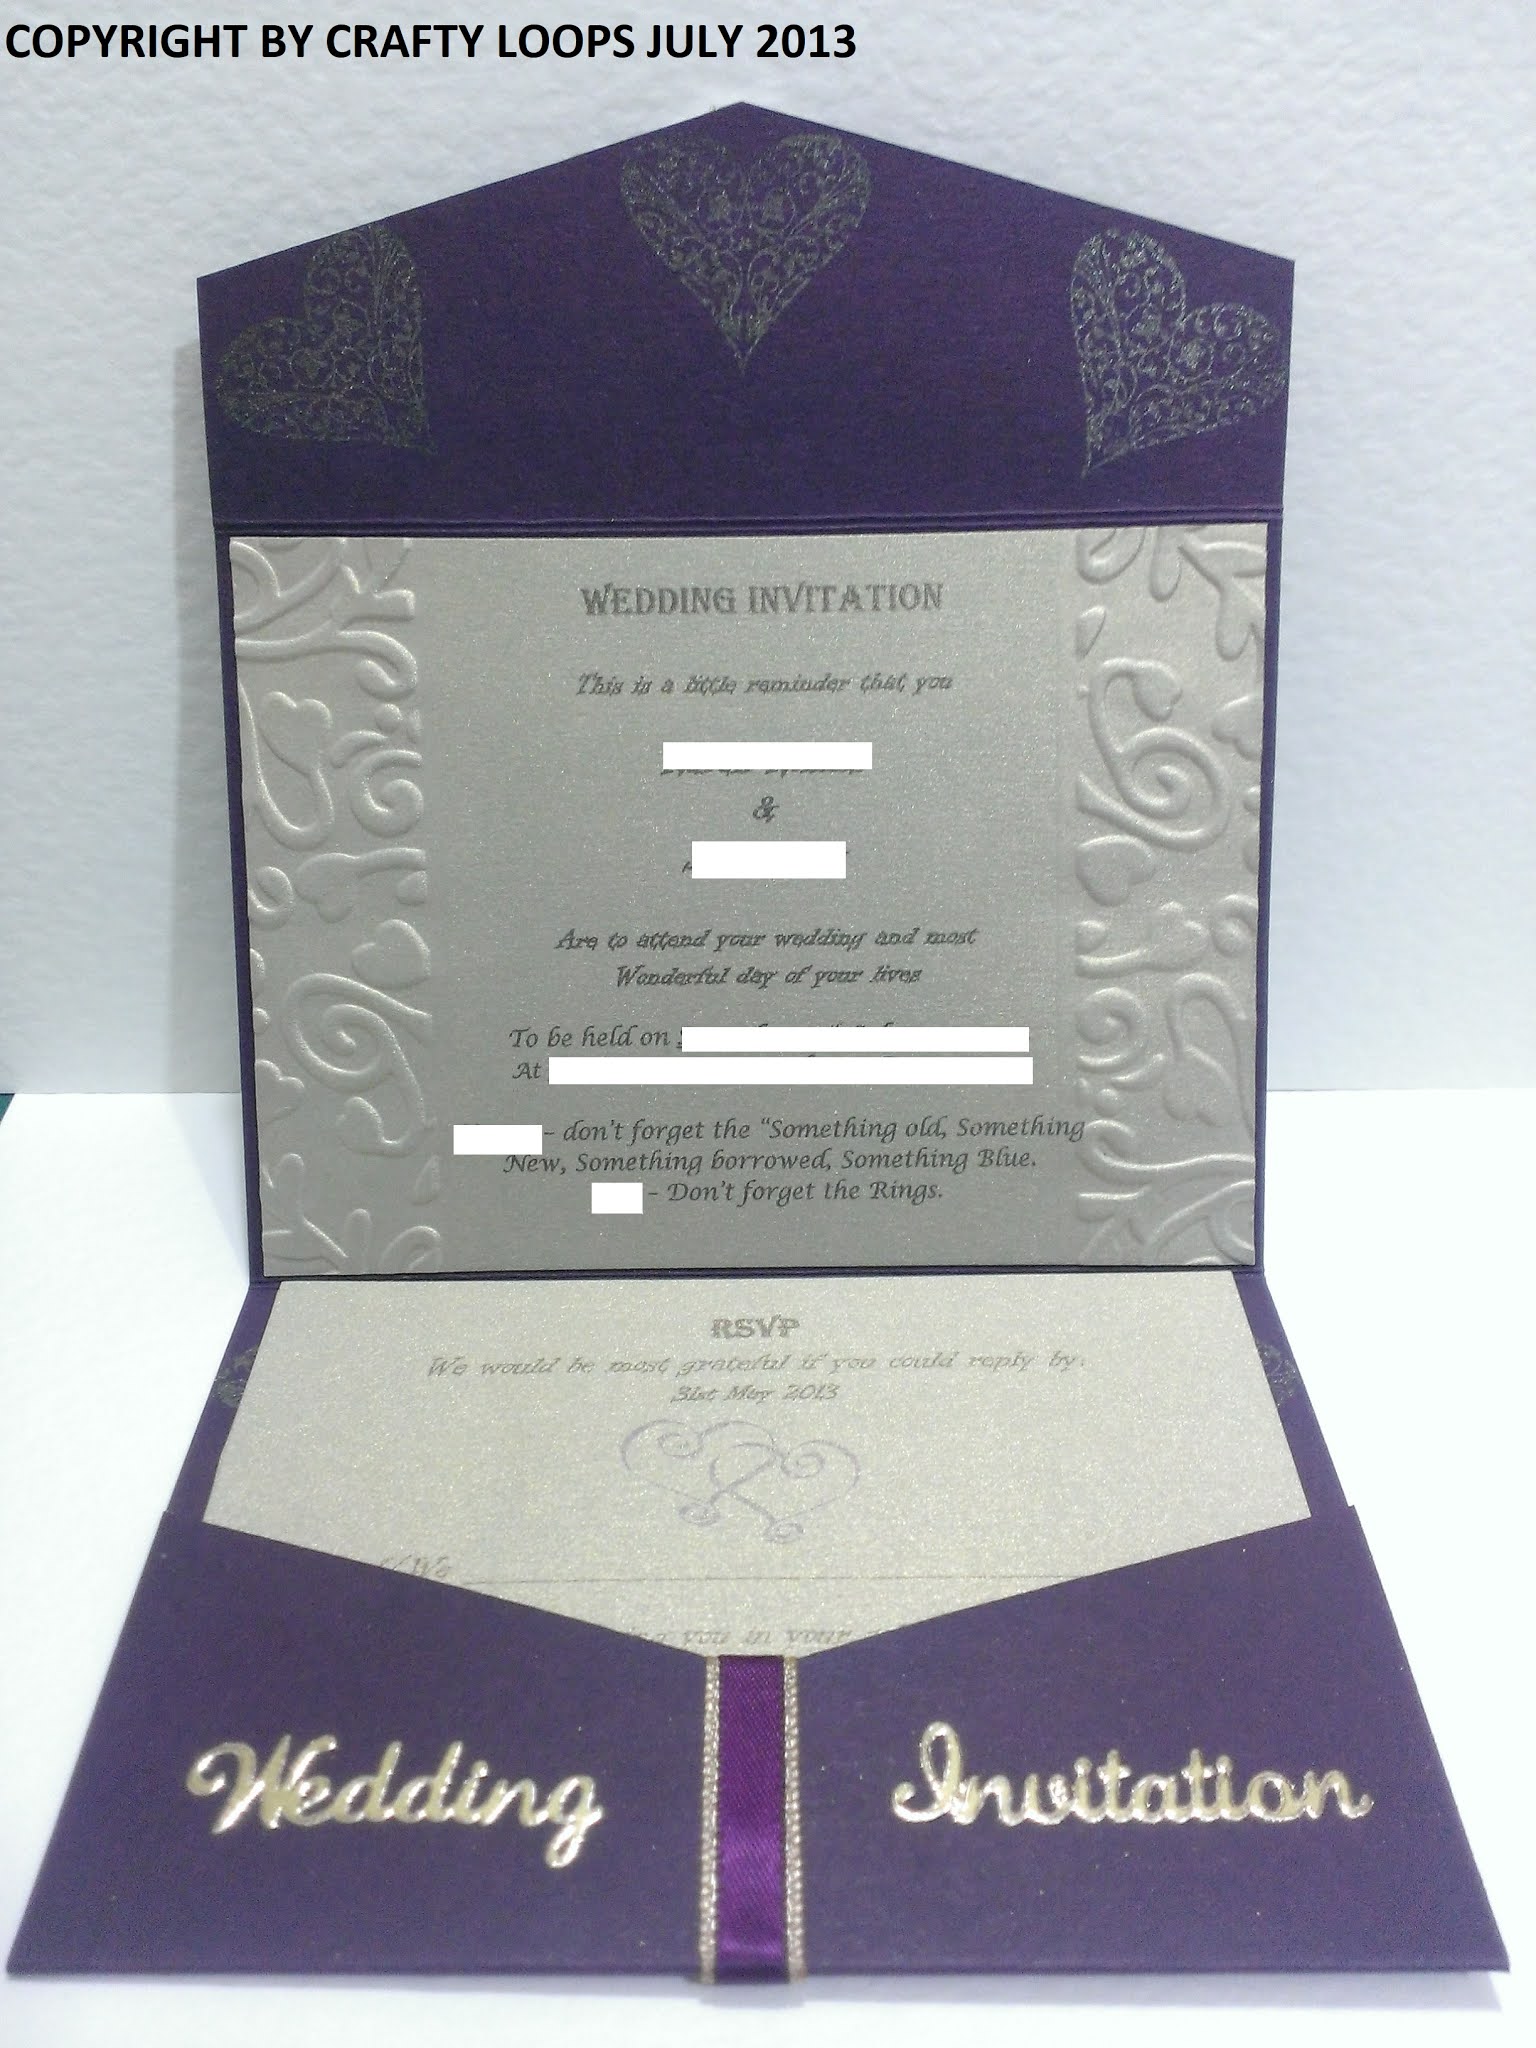
My instructions were.....simple, modern and elegant. The Bride didn't want anything too fussy, cluttered, girlie or vintagy. Bless her.....but she pretty much trusted me and left me to my own creative devices.....which was so trusting and brave of her, lol. I wanted to have everything made using the same style of font, colours, papers, embellishments, embossing etc., for total consistency throughout the wedding. Being a Crafter, I would know if it was a mis-mash of fonts, embellishments etc., regardless of whether anyone else would notice or not, heehee. So I was very particular to ensure that all the different bits and pieces I made, matched perfectly. Anywhoodles, the wedding colours were a Deep Purple with gold and cream accents.
WARNING: THIS POST IS VERY PHOTO HEAVY AND DETAILED. I TRIED TO LINK OR MENTION ALL THE PRODUCTS USED AT THE BOTTOM OF THIS POST.
Unfortunately, a lot of the items that I bought back in 2013 are from shops and sellers that are no longer open or available. So if you see something I've mentioned and it's link is not below, it is because the shop is no longer operating. I have tried to find alternatives for you. I wasn't sponsored by anyone or given anything for free. I bought EVERYTHING myself. In fact, the stationery was my gift to the couple. I'm merely listing the craft items used in case you want them yourself.

Here is just a couple of the boxed invitations I made...there were a lot more, lol


Sorry the photos are bad. The ribbon is in fact a deep purple and then a gold ribbon under it. The recipient simply had to make a little cut along the bottom of the seam where the box lid and base overlapped, to open it without damaging anything.


And, as if one layer of tissue paper wasn't enough, the actual invitation was wrapped in the most beautiful deep purple mulberry tissue paper and sealed with a little "Our Wedding" sticker

I am so disappointed that the deep purple colour is not showing in my photos. Again, I was so swamped, I barely had time to take these photos. The purple colour was very hard to photograph and tended to look like black on the photos....but I assure you, it is a deep purple colour


I embossed some lovely swirly heart details along the edge. I think it set it off just perfectly. Product details below.

Unfortunately, in this photo, I forgot to add the wee pearls along the ribbon on the inside..Doh! But wee flatback pearls were added along the inside ribbon too, just like the outside. This bottom half of the invite housed the RSVP, Menu, Wedding itinerary, directions to the venue and Gift details. It worked so great.

I also made these pretty little favours boxes for all the guests. Again, the photo is terrible and not showing the beautiful purple cardstock....Grrrrrr!


I made 2 Wedding Photo albums using, as usual, the purple card stock, gold and purple ribbon and flatback pearls. The lettering is gold peel-off's. I covered it with textured bookbinding Skivertex and it was bound using my Zutter Bind It All and Antique Gold coloured 3/4 inch O-wires. . The little label is a Spellbinders die. If you want to see more details about the album, go to my post here and for a video tutorial showing how I made the album, click here
 |
| Here are the menu's I made, sorry its a wonky photo and shiny cutlery glare, lol. As I'm sure you can imagine, Wedding tables have a lot of stuff on them. So I didn't want to clutter the tables by having loads of menus on it. So instead, I made a triangle shaped menu with menu's on all 3 sides. I used the purple card to make a triangle shaped dome. The frames on the menu matched those on the Seating Arrangements Canvas too. Details of the die and products used are at the bottom of this post. |
 |
| Here is the menu from the side view. Obviously there were 3 sides...but that's impossible to photograph. Each of the gold frame sides actually touched, like they were holding hands. They turned out so lovely. It all looked so much prettier in real life, lol. But I was in such a rush, that taking photos was the last thing on my mind. Sorry the photos are a bit rubbish! |
 |
| The beautiful table layout. You can just about see the Table Name Cards I made for each table. Numpty here forgot to take photos of the Table Names when they were just made!! But you can just about see the wee Table Name card beside the candelabra. |
 |
Here was how I made the Seating Arrangements Board. The couple wanted the table names to be named after Cocktails, rather than just numbered tables. The colouring is awful on this photo, I'm so sorry again. But the purple card was used, with pearlescent cream paper and then the frames were cut from gold pearlescent paper (same paper from the invitations) using the Ornate Oval Sizzix thinlit die. I used wee flat back gems on each corner. |
 |
This was the layout we went for. Sorry the photo is such a disaster (you're gonna hear that a lot!). The actual layout was not wonky at all....but my photography definitely was, lol. I bought a large canvas from The Works, and laid the names and tables out onto the canvas. The Wedding Venue provided the beautiful gold stand for the canvas. The placecards were again made using the purple cardstock, that was embossed with the same embossing folder used throughout. The same gold ribbon and gold and diamante ribbon slider was used here too. |
 |
| I wasn't going to have my handmade stamp anywhere on the Stationery as I thought that might be a bit cheeky but the Bride insisted and said that I should put it somewhere so people knew who made everything, lol. So we decided that the place cards would be the best place. For details of the products used see the section at the end of this post. |
 |
| I was overjoyed with the Guest Book. I think it turned out so well. The Bride didn't want anything too detailed. Just elegant and modern. I think I achieved that ok. After much Pinterest browsing for some inspiration, this is what I made for them. I used my Zutter Bind-It-All to bind the book using Antique Gold coloured 3/4 inch O-wires. |
 |
| Again, the same embossed purple card (using Sizzix embossing folder) and Ivory pearlescent paper with a hint of gold in it. I printed the purple hearts motif to either side of the "Guest Book" section from my laptop, as that motif was also a running theme throughout the Wedding Stationery. This was covered with white Bookbinding Skivertex. See below details. |
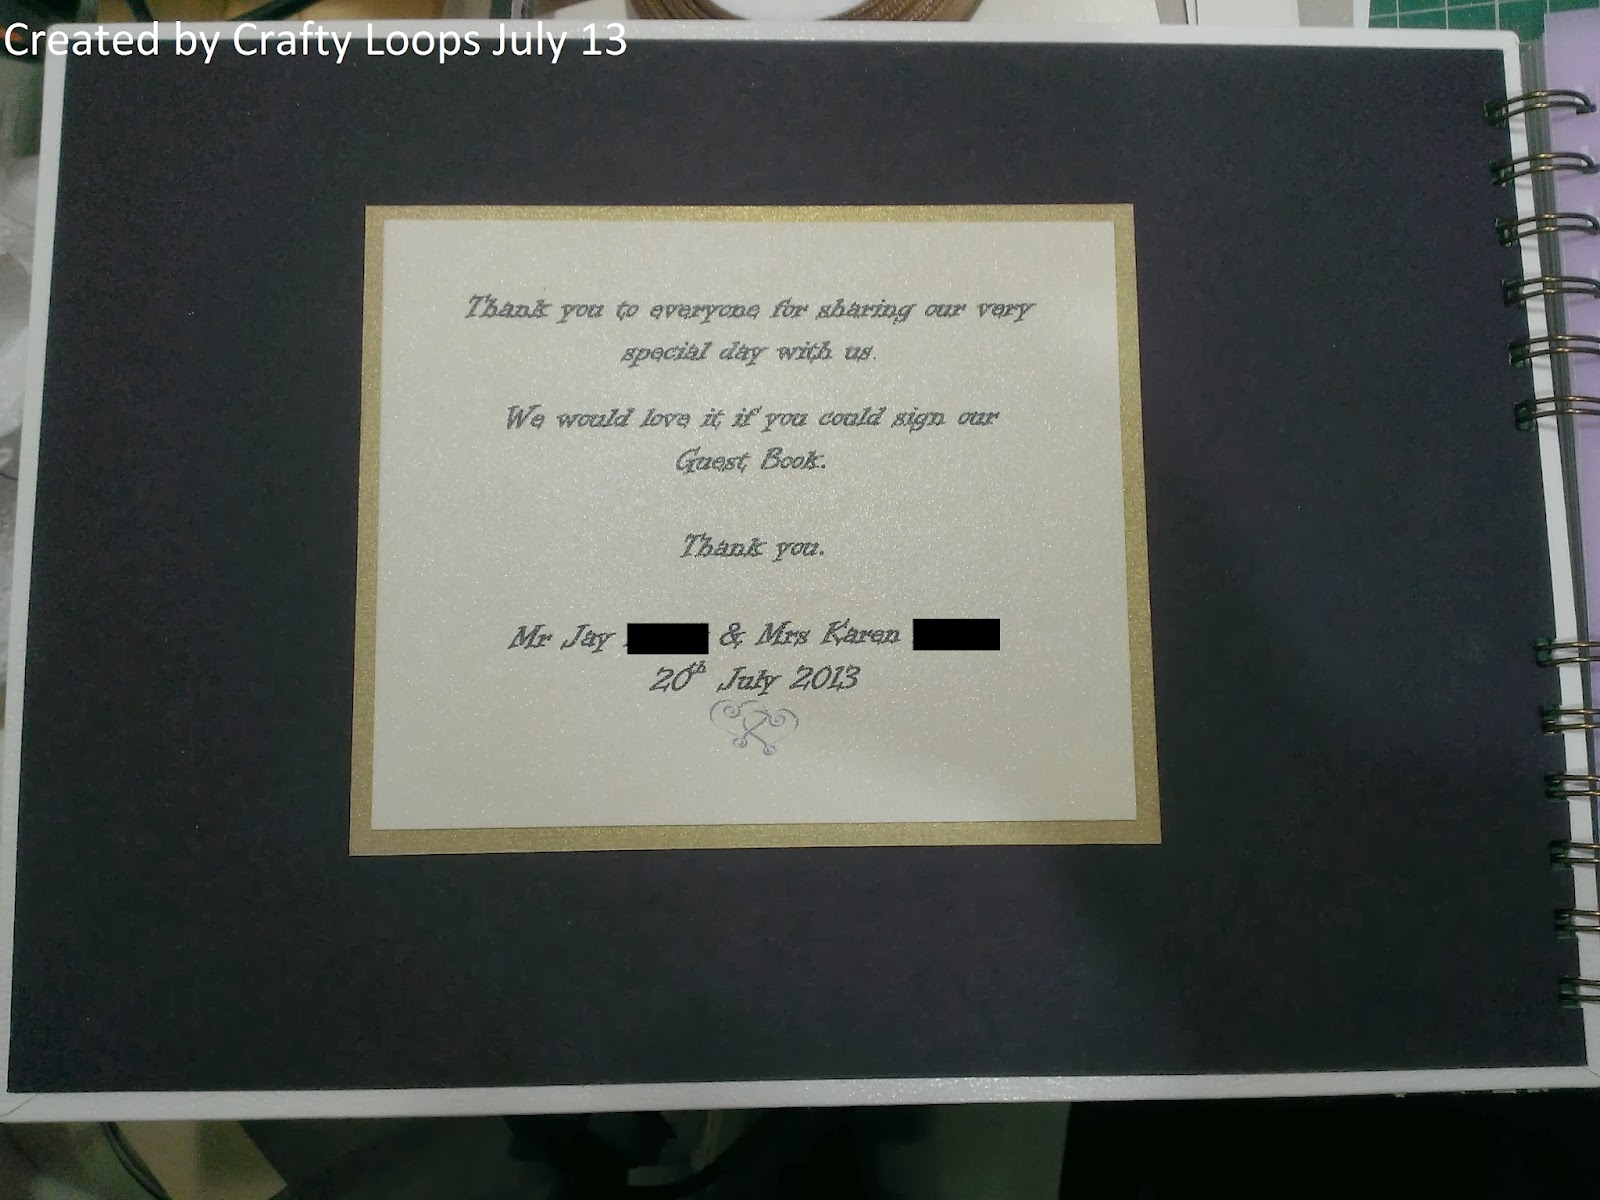 |
The inside page was simple and again kept to their colour scheme and heart design. Again I'm sorry the colour is so bad on the photos. I used the same deep purple cardstock. I decided not to add gems or pearls to the corners of the thank you note as I didn't want them restricting the albums ability to close properly, so the inside cover was not embellished at all. All product links below.  
Again the Guest Book carried on the heart theme and the same font was used throughout the wedding. I kept the actual book very simple with plenty of pages and lines for people to write on. The pages are actually 300gsm super smooth cardstock that I purchased on Amazon. I have intentionally not given a link to the cardstock supplier on Amazon simply because the price has nearly tripled from when I initially bought it and I think that is very exploitative. I feel I cannot promote it as it appears to have fallen victim to its popularity and the seller has taken advantage of this and inflated the price dramatically, unfairly in my opinion.
|
 |
| The Bride bought these wee gold boxes on Ebay and I decorated them very simply, but that was for a very good reason..... I didn't want to add any diamontes or pearls to the box, as they were being given to the Children at the Wedding. So I was very aware that wee hands might put said diamontes and pearls in their wee mouths. And I didn't want that! So I simply typed up their names, added the gold and purple ribbons. The purple ribbon I used was not the correct width I needed, so I worked around it by adding 2 lengths of ribbon, side by side and then stuck the gold ribbon right down the middle. This meant I got the width of ribbon I needed and the join was hidden by the gold ribbon. Then I added the embossed purple card to matt the name layer. The photo is making it look like the ribbon is unbalanced but its just the photo perspective. The gold ribbon was evenly laid across the purple ribbon, lol. |
 |
I made a simple little sign for the Wedding Guest Book. Again keeping with the Purple and Gold theme. I used the Purple Cardstock and matted it with the beautiful Gold coloured pearlescent paper. The font used is the same font that was used throughout the Wedding Stationery.
This is the wee sign I made for the Wedding Card Post Box. Its such a shame you cannot see the gold pearlescent sheen from the cream paper, it really is gorgeous in real life. But the camera just wasn't playing ball with me in any of these photos, so my sincere apologies. Everything did look amazing....you'll just have to take my word for it, lol. |
Here is a list of most of the main items I used to make everything.
Some of the item links, particularly those that I bought on Ebay, may not be the exact buyer as they are no longer listed but, I did my best to find you alternatives.
Some of the item links, particularly those that I bought on Ebay, may not be the exact buyer as they are no longer listed but, I did my best to find you alternatives.
Wedding Invitation Fonts - Algerian and Lucida Calligraphy
Wedding Invitation Gold Peel Off's - I purchased on Ebay but cant find them now. These are similar, on Etsy
"Our Wedding Day" Envelope Seals (used to seal tissue paper on Invites) - Ebay
Hougie Board (I bought mine on ebay years ago) - This was an integral piece of equipment when making everything for the wedding, from Invitations to favours and place cards. It would have been very difficult to make everything without this board.
Fiskar's SureCut A3/A4 Paper Trimmer 4153 - Here Ebay
Spellbinders Label 28 die - Spellbinders
Sizzix Swirly Vines with Hearts Embossing Folder - I can't find it on Sizzix UK site, but can be found on Sizzix USA Here or try on Ebay Everything Embossed was done using this folder. All the Invitations, place cards, favours etc.
The flatback pearls and diamontes were bought from a shop that is no longer in operation but these can definitely be found on most craft shops, Amazon and Ebay. Here is a quick search link on Ebay
The purple ribbon and gold ribbon were again, bought from a seller that is no longer in operation. But ribbon is a pretty easy find.
12x12 300gsm Cardstock Colour: Aubergine (well worth the money spent, for the phenomenal quality of this card) - Here (PDA Card and Crafts)
Pearlescent Paper - Here Ebay
Ivory Pearlised Cardstock - Here (Papermill Direct)
Wedding Boxes Lids - Ivory Pearlised Card 300gsm Cream Cardstock - Here (Papermill Direct)
Wedding Box Bases - Rich Cream Linen Card - 255gsm - can't remember where I got it, sorry, but search the details online and I'm sure you'll find it somewhere
Heart Stamp used on Wedding Invitations - Here (Debbi Moore Designs)
Bookbinding Skivertex in Grained White, bought from Ebay - Here
Heart Stamp used on Wedding Invitations - Here (Debbi Moore Designs)
Bookbinding Skivertex in Grained White, bought from Ebay - Here
Zutter Bind It All - Amazon
Zutter Antique Gold coloured 3/4 inch O-wires
Ranger Perfect Pearls Powder - Here on Ebay I used 2 whole pots!!!
Purple Mulberry Tissue Paper (wrapped around invites) - Here on Ebay
658268 Sizzix Movers & Shapers Bigz L Die - Pillow Box W/Labels By Tim Holtz - Here on Sizzix. On a personal note: A massive Thank you to Susan from Country View Crafts for finding me this die. I couldn't have made these favours without her incredible help and service. Awesome Company.(Countryview Crafts)
Gold Buckle Sliders with Diamantes, 22mm. I couldn't find my original seller on Ebay, but I found similar ones in silver from this site, called The Button Shed
Large Canvas from The Works
Guipure lace was bought from an Etsy seller, no longer selling but I'm sure you can find the same if not similar, online. Here is a quick search link for Ebay and for Etsy
Frame die - Sizzix Thinlits die, Frame, Ornate Oval # 658949 - Find it on Sizzix
Double Sided Tape (of which I used hundreds of metres!!) I used both Redline tape and Scor-tape. The Redline tape I bought at the Craft Fair in Belfast but can be bought Here at AffixItCraft. I originally bought the Scor-Tape from Blitsy in the USA but they are no longer operating. You can probably try looking on Ebay for this adhesive, try searching under its brand name of, Sookwang tape. Honestly, Scor Tape/Sookwang tape is THE best tape I've ever used.
And in case you want to know, my printer was AWESOME throughout this whole wedding process. It took a lot of abuse and a crazy amount of printing to make everything perfect for the big day. My exact model is no longer available but you'll find something similar in the Pixma range. Its awesome.
Canon Pixma MG6150 - Here (Currys PC World).
Phew!!!!!! Sorry that was such a big one and for taking 8 years to share it. I'm a numpty. I'm so cross at myself for not taking better photos, particularly when it came to showing the proper colour of the invites cardstock etc. So frustrating. But I do remember at the time being completely flat out, trying to get everything made on time. So the photos were an afterthought. Well, that's it from me folks. Maybe I'll have something new to share on my next post or maybe it'll be some ancient old project.....you just never know with me, lol.
Toodles Noodles.....Lee aka Crafty Loops xx
If you would like to Support my Blog by buying me a coffee, you can do so Here...no obligation, of course.

You can buy me a coffee by clicking on the above image, or clicking here. Thanks so much.
Comments
Post a Comment
Helloooooo! Anybody out there??!! Hey....there you are! Thanks for leaving a comment and stopping by my Blog. Lee x